This blog post may contain affiliate links. Affiliate links give a small commission of a sale to the affiliate(me). Products are at no extra cost to you.
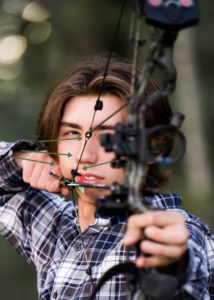
Archery is one of hunting’s biggest challenges. It takes patience, confidence, restraint, and accuracy to become a successful whitetail archer.
I want to share with you my best 7 tips on archery shooting for beginners. These tips will help you consistently shoot good groups that are bound to put your arrow in the kill zone of your next deer.
The 7 tips on archery include the following.
Tips on Archery 1: Avoid the death grip
What is the death grip?
The death grip is just the way that I refer to squeezing your bow super tight. You may feel yourself tensing your whole arm to “steady” your sight pins. You may think that by holding “steadier” you will in return shoot more accurately.
However, this is the opposite of what happens. What will happen to your accuracy has to do with the amount of potential energy the bow has stored in it while you are drawn back. When the energy is transferred into kinetic energy, all the torque in your wrist will be released through the bow.
The bow will automatically release the energy and that will change the amount of torque in your wrist. Since your wrist will then have no reason to squeeze the bow as aggressively, your wrist will move to give you bad grouping.
Your wrist will most likely turn into your body. If you are right-handed (like me) your shots may be inconsistently shooting to the right. If you are left-handed, then your shots may be inconsistently left. This tip on archery will allow you to stay smoother through your shot.
Tips on Archery 2: Find your anchor points
Anchor points are just like reference points in physics. They are a destination that can help you double-check you are aligned before taking your shot. This tip on archery will create an abundance of accuracy if you can consistently use your anchor points after your bow is sighted in.
What are the 4 main anchor spots that I use? I use a peep sight, and kisser button, I also have two different other points that help me.
What is a peep sight?
A peep sight is a little circle that aligns perfectly with your sight pin. You can only see through your peep sight if you are looking through it at a certain angle. The best part about this is that your peep sight location is unique for every bowhunter.
It is based on a lot of different factors, and I would recommend going to a bow specialist to have one installed. I would also request a rubber connector, but I will go more in-depth with my experience with a peep sight in another blog post.
As far as a peep sight that I recommend, I love G5 products because they are of great quality and support a good mission. But any peep sight should work for all compound bows.
Get a G5 Outdoor Meta Pro Peep Sight Here at Bass Pro Shops for under 11 dollars.
What is a kisser button?
A kisser button is a little rubber disk that goes on the string closest to your face.
The objective of a kisser button is to be able to put it right where your top lip meets your bottom lip on the side that you shoot your bow. It is supposed to be comfortable. You should never have to shove it into the side of your mouth. You should also never have to lean forward to have the kisser button reach your mouth.
The kisser button should be something that falls into place when you pull your bow back.
The kisser button that I use and recommend is a Truglo black kisser button. It is made of a durable; yet strong material. It is also very comfortable.
Get a Truglo Kisser Button Here at Bass Pro Shops for under 6 dollars… it is so worth it!
How I use my thumb knuckle to create another anchor point.
I always use my thumb knuckle by having it touch my jawbone. This is something that has worked for me. It is my own personal thing that I do, and it may or may not work for you. I like to use it as just another way to tell my brain that I am ready to release my bow.
How I use my nose as an anchor point.
The last anchor point I use is a more common practice. It is by touching the tip of your nose to the tip of your bowstring. I do this to keep my right eye perfectly aligned with my peep sight. It also can help you stabilize your bow a tiny bit. This helps me to be 100% certain I am ready to release my bow once my sight pin is on my spot.
Tips on Archery 3: Lean into your shot
In athletics, you hear about being in an athletic position. This is the same with archery hunting. You want to be leaning into your shot for a couple of reasons.

One, it helps you feel confident in yourself. When you are confident you are much more likely to stay calm, and collected, and make a much better shot.
I simply just open my front foot a little bit and put about 60% of my body weight on the front leg. I also drop my front shoulder a little bit. It makes a world of difference especially when you are aiming at your trophy buck and the nerves start to kick in.
Tips on Archery 4: Trust your bow
I was talking earlier a little bit about physics. Although I am no physics major, I do know that your bow is simply a machine. Once you have that machine dialed in and accurate, all the future error is in the archer, not the machine.
Have the mindset of knowing that your bow will do the same thing every time. Unless you somehow tweak or break it, but even that would still be your fault.
With this mindset tip on archery, you will have peace of mind knowing that if everything aligns and you have done all the proper things, your arrow will fly straight. Ultimately, you will get that trophy buck on your wall.
Tips on Archery 5: Pull your trigger without knowing when it will fire.
This tactic is one that is taught more for rifle hunting. It is a way that you do not flinch when shooting your gun. You will be able to keep your sights on your target throughout the entire shot.
I am not going to go into much detail because it is a simple task that just takes some thinking. So, once you are ready to shoot just slowly pull the release. Once the arrow is released hopefully with a little surprise just make sure to hold your follow-through.
I personally like a release that acts like a trigger rather than a thumb release. (although I know that the thumb releases are gaining popularity)
Look into a BlackOut Apostle Bow Release Here at Bass Pro Shops. (the wrap around your wrist with a trigger type)
Shop for a Blackout 4-Finger Bow Release Here at Bass Pro Shops. (the thumb release type)
Warning! If you choose to switch what type of release you may want, I would suggest going to your local archery dealer and trying them out before spending your money on a release you may not like.
Tips on Archery 6: Follow-through
This is probably my biggest struggle to this day. I always had the mindset of “after the arrow is gone, it doesn’t matter what I do.” But this thought process is completely wrong. It does matter.
The follow-through may be one of the most important parts of your shot. Without a good follow-through, you are likely to see inconsistency in your arrow patterns.
This is caused by the milliseconds between releasing your arrow, but the arrow is still going through the bow. If you are looking to see where the arrow is going to hit that deer, you will tend to twitch your wrist while the arrow is still flying through the bow. Which will cause the arrow to be slightly thrown off a straight line. At 10 yards, it may not make a huge difference; however, at 40 yards you will see that mistake amplified.
What should you do instead?
You should focus on pulling your release and let your bow stay straight up until you hear the arrow hit your target. Then, you should drop the bow straight down with just the simple motion of your wrist.
This tip on archery will help to ensure that you are not twitching left or right to see where your arrow hit the target. Let me tell you a little secret. If you trust your bow and use all your anchor points properly, the arrow will fly straight as can be! Therefore you do not need to worry about where the entry point is until you go get your arrows. Resulting in great shooting patterns or a dead deer in your freezer.
Tips on Archery 7: Practice shooting at weird ranges
Once you have your bow sighted in at 20, 30, or 40 yards, (whatever sight pins you like. I personally have 10-, 20-, and 30-yard pins) You should practice at not only those ranges, but also at 27, 18, or any random yardage between your pins.
This may be a struggle at first because you must get used to not putting your pin right on the spot you want to hit. You may also notice that at 14 yards, your 10-yard pin may show no difference. This is because with the technology and speed of the compound bows today, your arrows fly so fast. With such a short distance to travel at such a fast arrow, there may be little to no difference, but at 35 yards your 30-yard pin may be quite lower than expected.
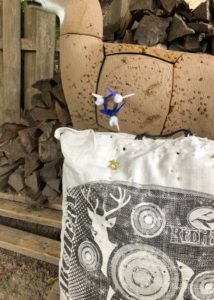
The target that my father and I have used for over 4 years is a GlenDel 3D Deer target. The best part about the deer target is that it has a middle square that can be rotated. So once you have shot out one side, you do not need another target. You just need to rotate the square to the next side. So it lasts a SUPER long time!
View the Field Logic GlenDel 3D Deer Target at Bass Pro Shops Here! It is a great, long-lasting purchase.
As hunters, we do this because a live deer will not always come in and stand at 20 yards broadside. They will walk in at whatever yardage they like. Practicing at different ranges and angles helps you prepare for being able to put that arrow in a deer no matter how or where the deer walks in from. If he is in the comfort range of your bow and presenting a clean shot, you should be able to bring home dinner!
I know these 7 tips on archery will help you to become an overall better archer and shoot tighter groupings of arrows.
Thank you for visiting The Whitetail Teacher! If you enjoyed this post, make sure to share it with a friend. Also, don’t forget to check out The Whitetail Teacher Merchandise!
If you have any questions or recommendations for new blog posts, please use the contact form.
Learn, Plan, Execute,
The Whitetail Teacher